πŸ₯ Architecture Manual & Live Demo

MediCare Hospital Management System

πŸ‘¨β€πŸ’» Designed & Engineered by Dilshad Abdulla | Designer & Software Engineer

Explore end-to-end clinical operations, role-based workflows, outpatient & inpatient lifecycles, and financial billing engines built with Python 3.13, Django 5.2, and PostgreSQL.

πŸ‘οΈ 1,158 Total Page Views
πŸ’³

Private Enterprise Repository β€” PayPal / Bank Wire Payment

The GitHub repository (DilshadGit/hospital_sys) displays the public README.md overview, operational flowcharts, and EMR specs for buyers to evaluate. Full production source code access, private repository invitation, and turn-key deployment rights require verified Commercial Payment via PayPal or Bank Wire Transfer to Lead Software Engineer & Architect Dilshad Abdulla.

🏷️ Suggested Pricing Tiers:
β€’ Source Code License: $12,000 – $20,000 USD
β€’ Cloud Setup & Deployment: +$2,500 USD
πŸ“‘ Section Pagination & Navigation

Interactive System Flowchart Sections

Active: Section 1.1 of 1.7
Section 1 of 7
πŸ“– Official System Manual & Client Guide Repository: DilshadGit/hospital_sys

Hospital Information & Electronic Medical Record (EMR) System

Engineered & Authored by Dilshad Abdulla β€” Senior Software Engineer & Lead System Architect.

⚑ Executive System Overview

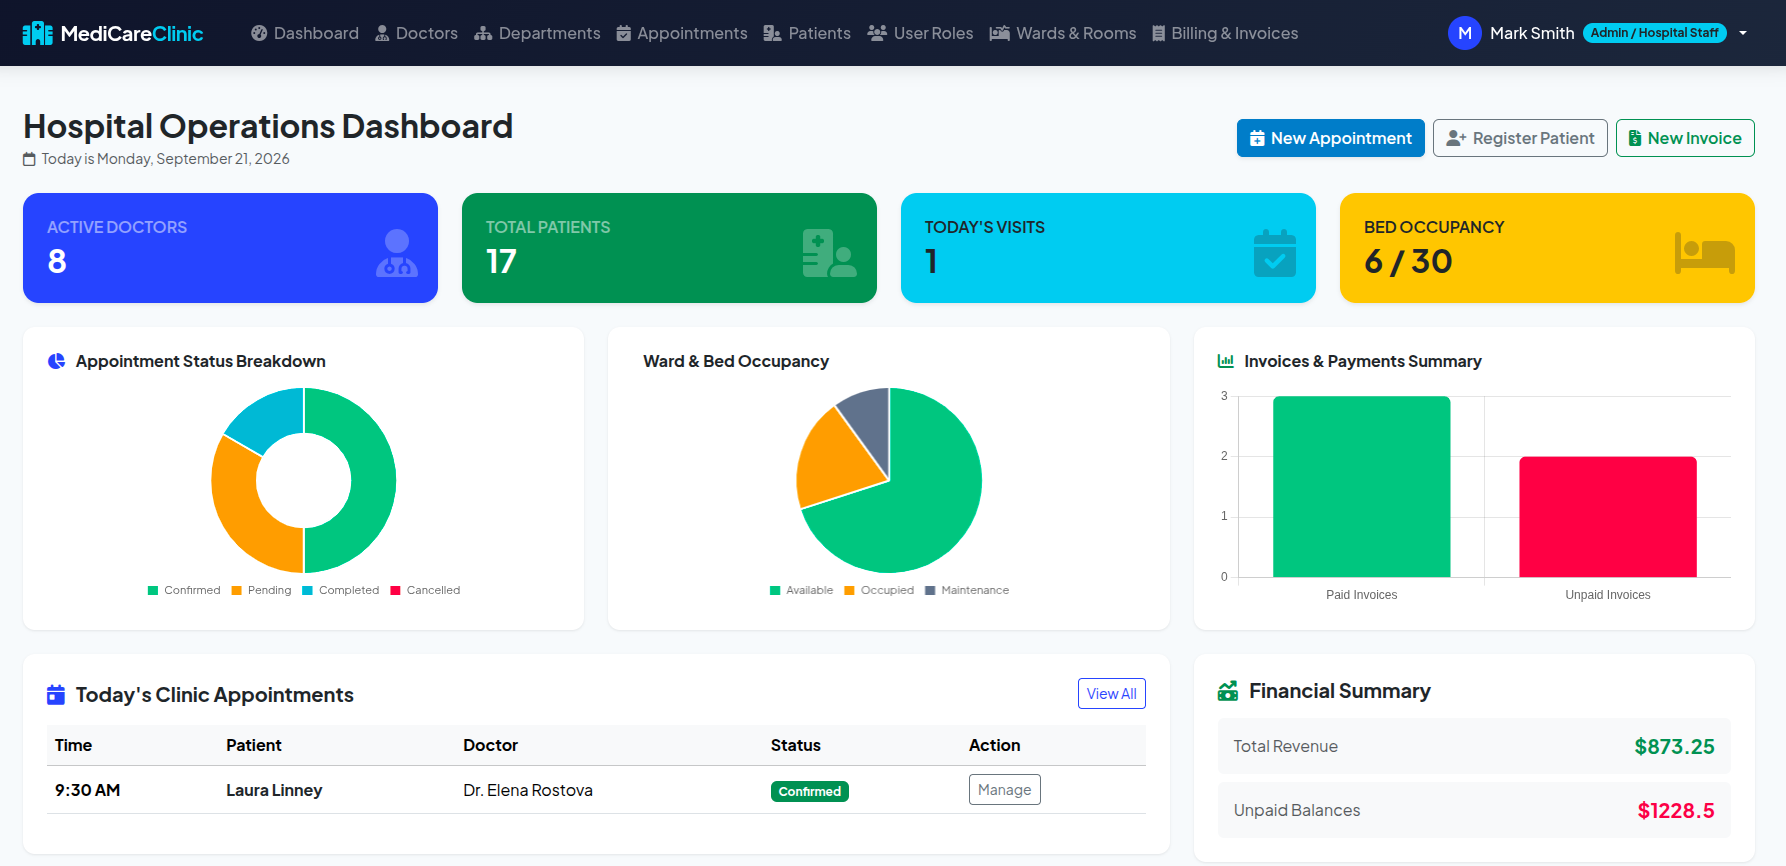
The Hospital Information & Electronic Medical Record (EMR) System (DilshadGit/hospital_sys) is a comprehensive, HIPAA-compliant digital healthcare management platform designed for modern hospitals, medical centers, and clinical networks. It streamlines the entire lifecycle of healthcare deliveryβ€”from initial patient registration and outpatient appointments to inpatient bed management, electronic health records (EHR/EMR), pharmacy dispensing, diagnostic lab tracking, and multi-payer insurance billing.

πŸ› οΈ Technology Stack & Client-Friendly Guide

Technology Layer Framework / Tool What It Does & How It Works (Client Explanation)
Backend Engine Python 3.13 & Django 5.2 Handles hospital logic, secures medical records, and manages user permission safety.
Database & Caching PostgreSQL 16 & Redis Stores millions of patient files reliably and caches real-time ward bed availability.
Interoperability Standard HL7 FHIR R4 Allows smooth electronic data exchange with external diagnostic labs and insurance networks.
Interface & Display HTML5, Vanilla CSS3 & JS Fast, responsive dashboard for doctors, nurses, and receptionists on PC, tablet, or phone.
Digital Reports Engine ReportLab PDF Engine Generates printable receipts, medical discharge summaries, and insurance claims.
Security & Privacy AES-256 & Audit Logs Enforces HIPAA privacy rules with encrypted data storage and full access logs.

πŸ” Staff & Patient Portal Access Architecture

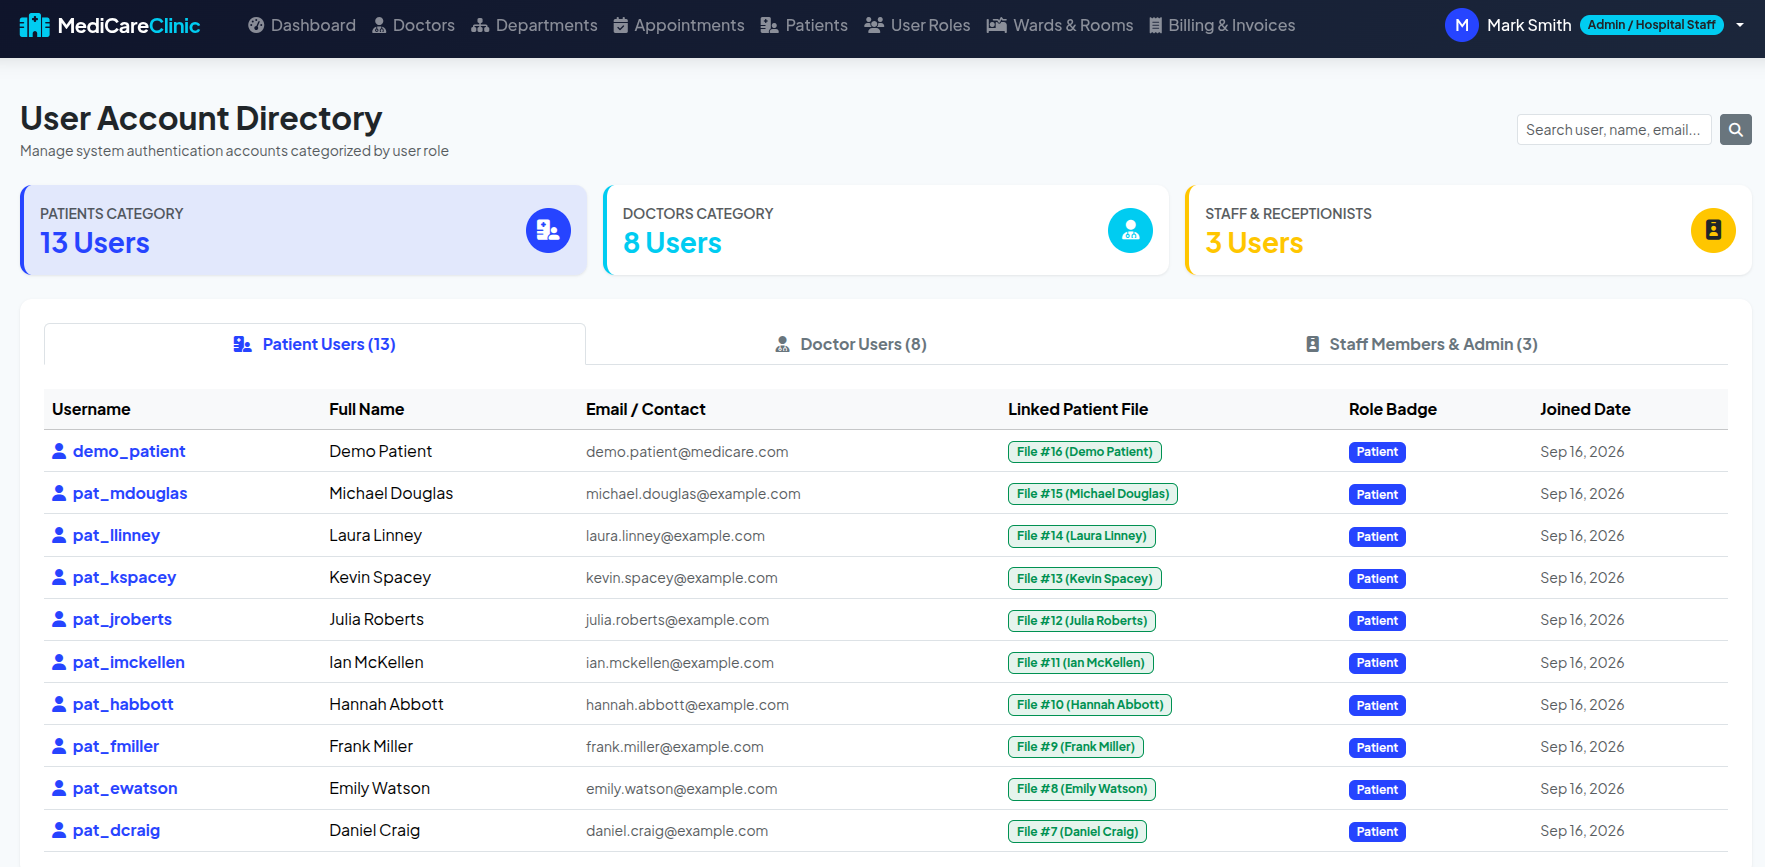
The platform utilizes an enterprise Role-Based Access Control (RBAC) model so users only access data permitted by their clinical function:

πŸ₯ Hospital Staff Portal (2FA / Active Directory)

  • Doctors: EMR writing, e-prescriptions, diagnostic orders.
  • Nurses: Ward bed allocation, vital sign charts, nursing notes.
  • Receptionists: Walk-in intake, appointments, queue checking.
  • Pharmacists: Medicine dispensing, stock batch control.
  • Lab Technicians: Specimen tracking, uploading test results.
  • Finance: Invoice generation, insurance claim processing.

πŸ“± Patient Self-Service Portal (OTP Mobile Verification)

  • Appointment Booking: Select specialist doctor & time slots.
  • Medical History Access: View past visit summaries & e-prescriptions.
  • Diagnostic Results: Download verified lab reports & images.
  • Online Bill Settlement: Pay bills via PayPal, Card, or Wire.

πŸ–₯️ What is Displayed on Each System Page

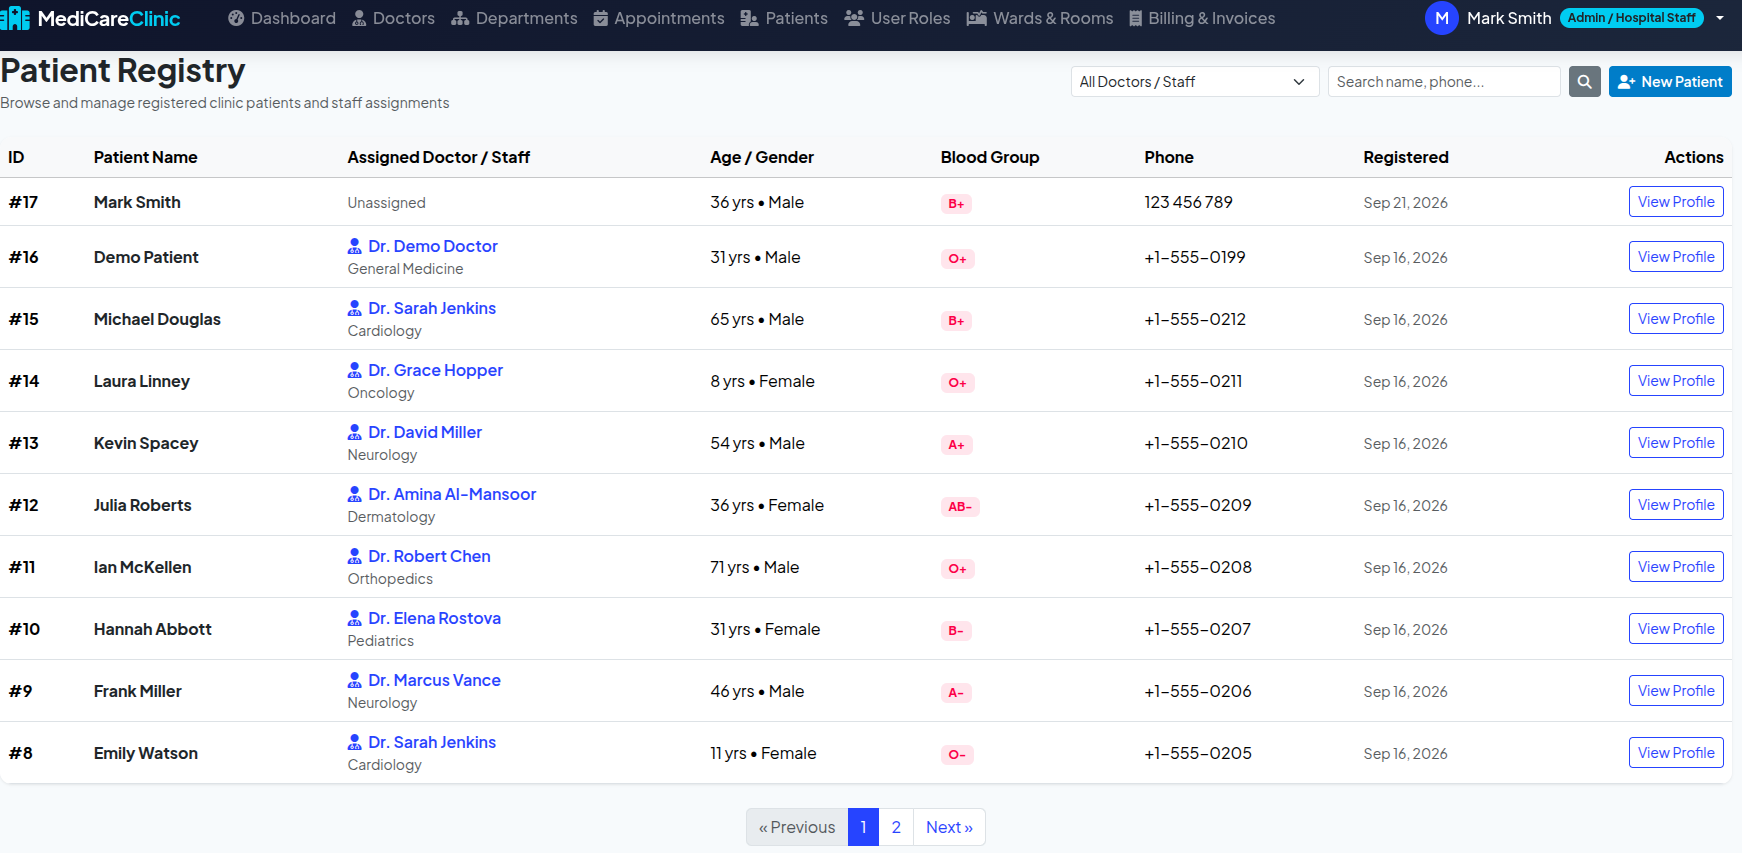
πŸ“‹ 1. Patient Intake & Registration Page

Displays search bar for National ID/MRN, patient demographics, emergency contacts, insurance policy details, blood type, and emergency triage priority (Red/Yellow/Green).

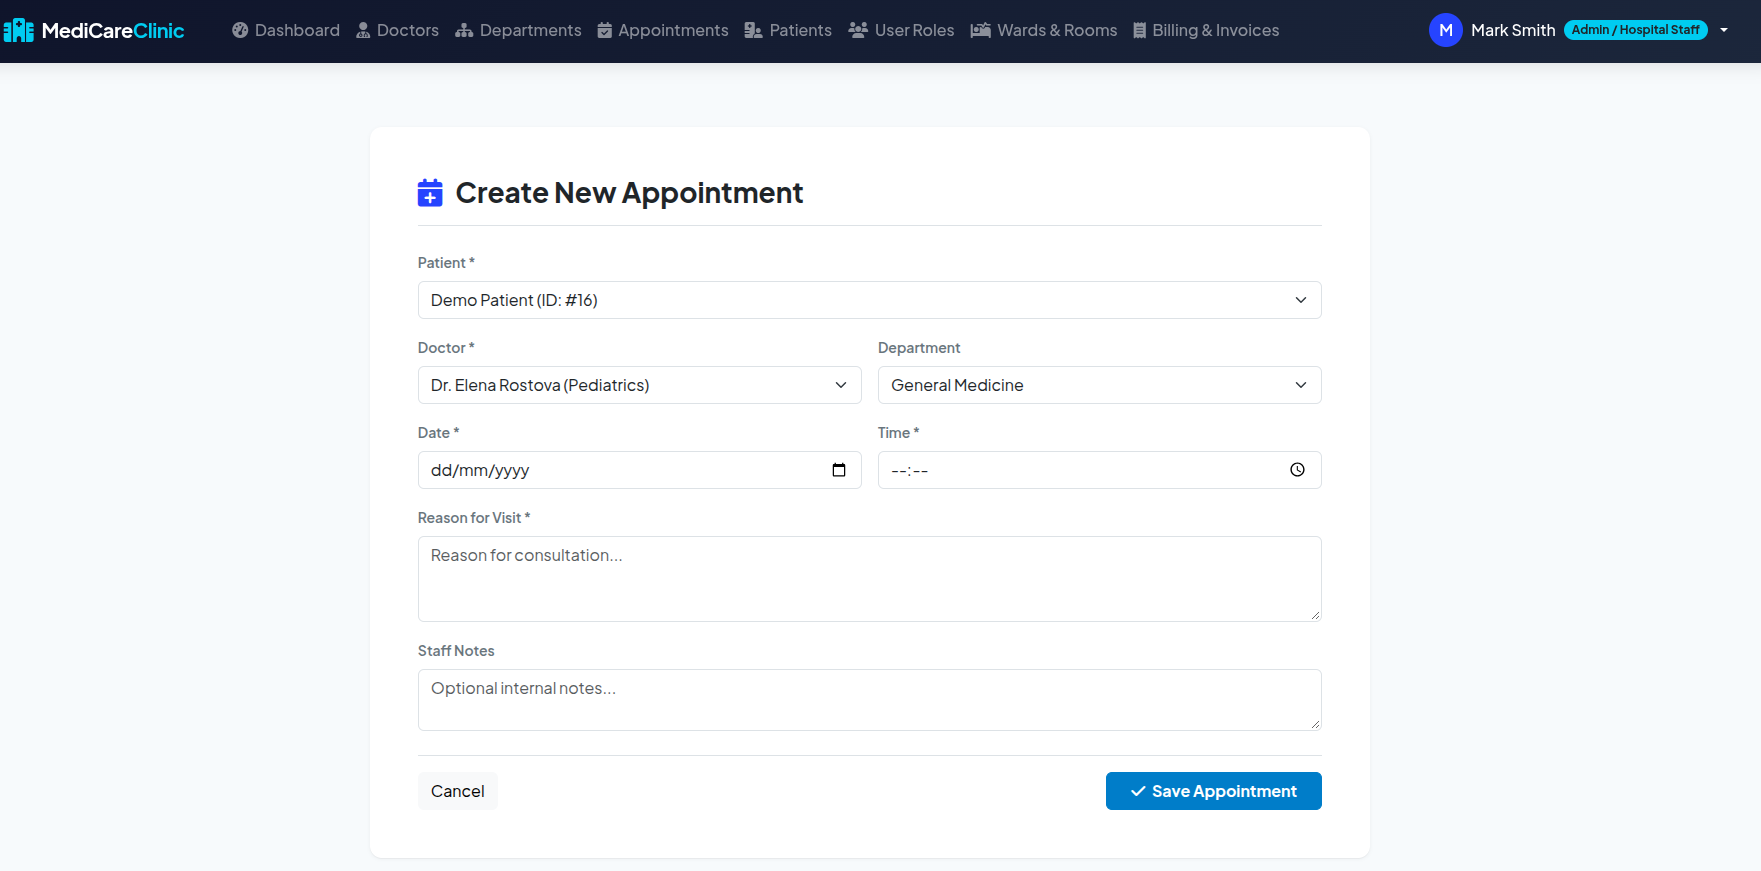
πŸ“… 2. Staff Roster & Outpatient Booking Page

Displays staff duty schedules (doctors' ON-DUTY vs. OFF-DUTY days, shift hours, consultation room allocations), live booking calendar, queue position, and arrival status tags (PENDING, CONFIRMED, COMPLETED).

πŸ“‚ 3. Patient Lifetime EMR & Medication History Page

Displays lifetime medical record timeline: chief complaints, vital sign graphs, ICD-10 medical diagnoses, historical medication logs, prescribing physician records, and allergy alert checks.

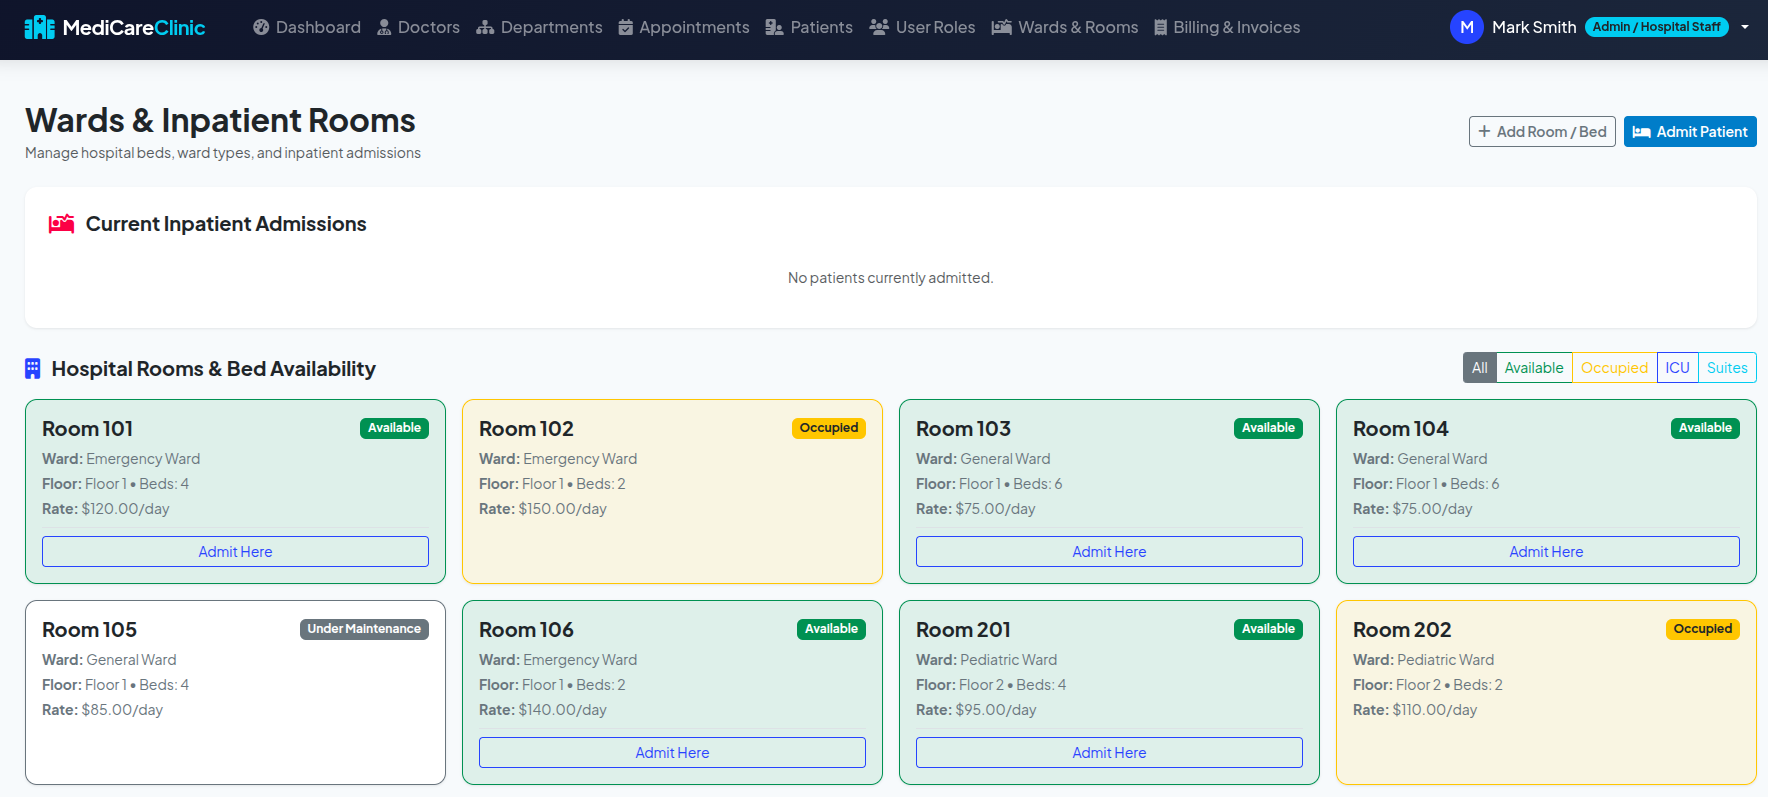
πŸ›Œ 4. Inpatient & Ward Capacity Page

Displays real-time ward grid across 7 room types (ICU, Private, General Ward). Features color-coded bed status toggles: 🟒 AVAILABLE, πŸ”΄ OCCUPIED, 🟑 CLEANING.

πŸ’Š 5. Pharmacy Inventory Page

Displays doctor e-prescriptions, inventory batch numbers, stock expiration alerts, drug interaction safety warnings, and automated stock deductions.

πŸ§ͺ 6. Laboratory & Diagnostic Page

Displays diagnostic test requisitions list, barcode specimen tracking, technician result input, and DICOM radiology image viewer attachments.

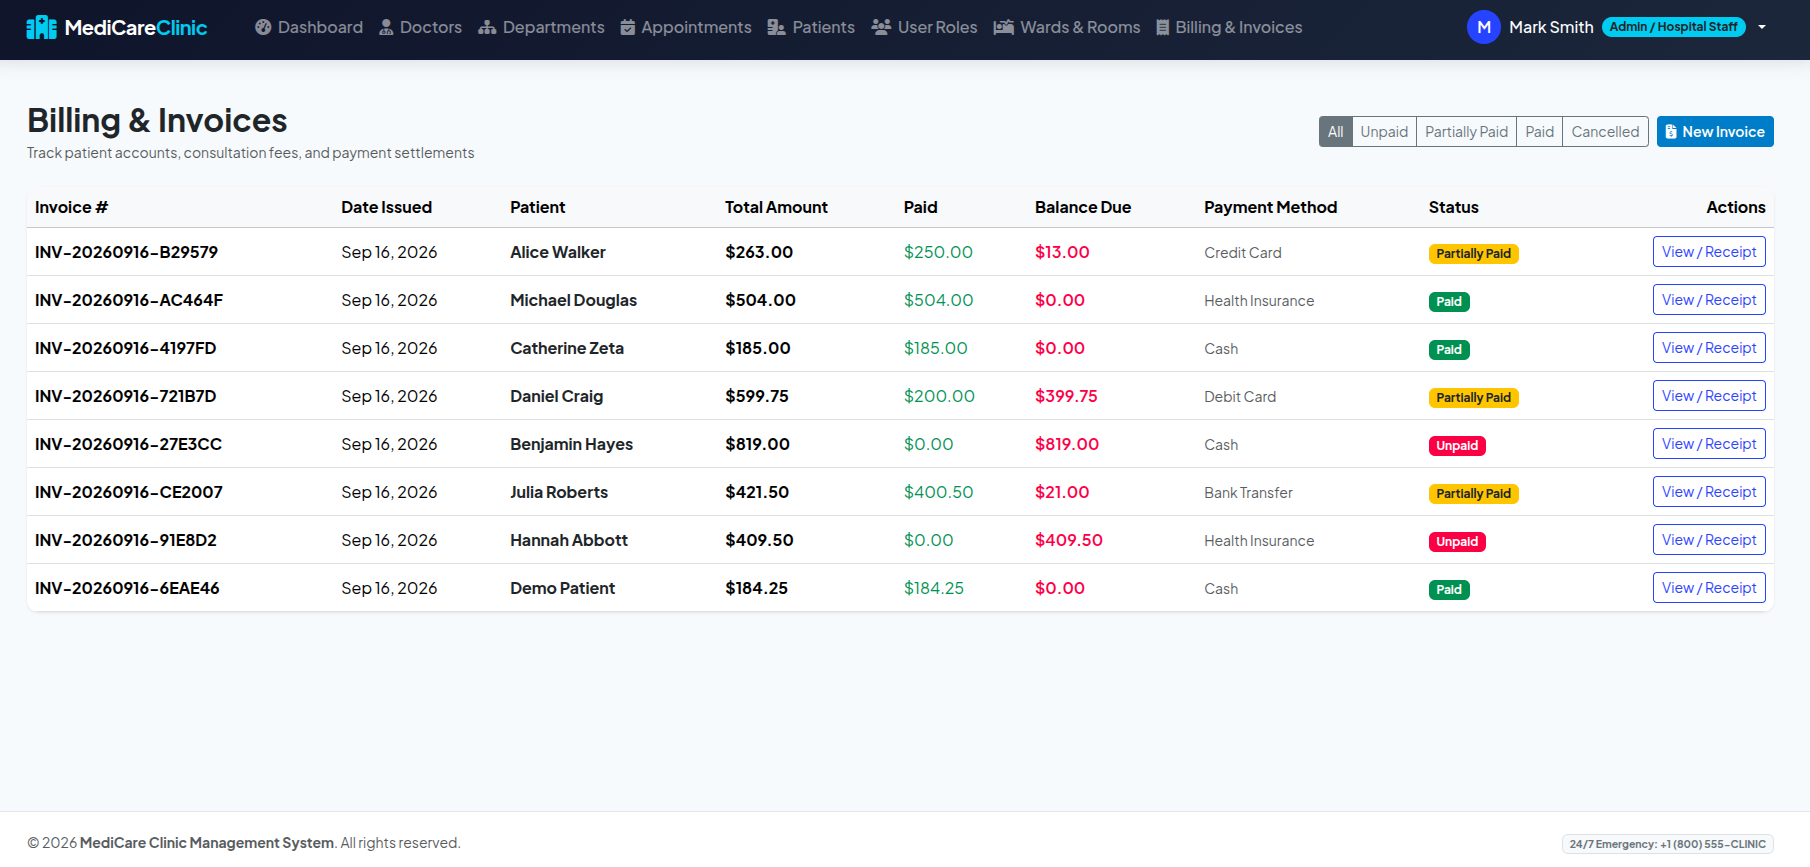
πŸ’³ 7. Billing & Insurance Claims Page

Displays itemized bill calculation (consultations, room days, meds, labs), copay/deductible splits, insurance claim status, and receipt PDF downloads.

πŸ’‘ Lead Architect's Advice for Hospital Management

  • πŸ“Š Visual Operational Flowchart Recommendation: We strongly advise retaining the visual Mermaid flowchart in the manual. Visual diagrams provide instant clarity for hospital directors, administrative auditors, and clinical supervisors to inspect cross-departmental patient handoffs at a glance.
  • πŸ“… Automated Shift Roster Synchronization: Publish staff duty schedules 2 weeks in advance within the roster module so the patient appointment booking engine automatically updates available doctor consultation slots.
  • πŸ’Š Cross-Checking Past Medication History: Require doctors to inspect the Historical Medication Log during consultations to prevent dangerous drug-drug interactions with newly prescribed medications.
  • πŸ”’ Privacy & HIPAA Integrity: Enforce mandatory 2-Factor Authentication (2FA) for all hospital personnel and configure automated encrypted off-site PostgreSQL backups.
  • ⚑ High-Availability Infrastructure: Maintain server room uninterruptible power supplies (UPS) and utilize Redis caching so hospital operations run smoothly even during temporary internet interruptions.

πŸ“Š Master End-to-End Hospital Operational Flowchart

flowchart TD
    Start([Patient Enters Clinic / Portal]) --> RegCheck{Already Registered?}
    
    RegCheck -- No --> Register[Patient Registration / Reception Walk-in]
    RegCheck -- Yes --> Login[Login / Identity Verification]
    Register --> Login
    
    Login --> ServiceChoice{Required Service?}
    
    %% Outpatient Flow
    ServiceChoice -- Outpatient Consultation --> BookAppt[Book Appointment with Doctor]
    BookAppt --> ApptPending[Status: PENDING]
    ApptPending --> ConfirmAppt[Reception/Doctor Confirms: CONFIRMED]
    ConfirmAppt --> DoctorConsult[Doctor Consultation & Examination]
    DoctorConsult --> ApptComplete[Appointment Marked COMPLETED]
    DoctorConsult --> CreateEMR[Create Medical Record & Prescriptions]
    CreateEMR --> NeedAdmission{Needs Admission / Surgery?}
    
    %% Inpatient Flow
    NeedAdmission -- Yes --> CheckBed[Check Available Ward & Room]
    ServiceChoice -- Direct Inpatient Admission --> CheckBed
    
    CheckBed --> BedAvailable{Bed Available?}
    BedAvailable -- No --> Waitlist[Waitlist / Transfer / Select Alt Ward]
    Waitlist --> CheckBed
    BedAvailable -- Yes --> CreateAdmission[Process Admission: Room Marked OCCUPIED]
    CreateAdmission --> InpatientCare[Inpatient Treatment & Rounds]
    InpatientCare --> DischargeDecision{Ready for Discharge?}
    DischargeDecision -- No --> InpatientCare
    DischargeDecision -- Yes --> DischargeSummary[Author Discharge Summary & Mark Room AVAILABLE]
    
    %% Billing Flow
    NeedAdmission -- No --> GenBill[Generate Invoice / Bill]
    DischargeSummary --> GenBill
    
    GenBill --> AddBillItems[Calculate Consult, Meds, Labs & Room Fees]
    AddBillItems --> BillIssued[Invoice Status: UNPAID]
    BillIssued --> ProcessPayment[Patient Makes Payment: Cash/Card/Insurance/Bank]
    ProcessPayment --> PaidCheck{Full Amount Paid?}
    PaidCheck -- Partial --> PartialPaid[Status: PARTIALLY_PAID]
    PartialPaid --> ProcessPayment
    PaidCheck -- Full --> FullPaid[Status: PAID]
    
    FullPaid --> Finish([Patient Discharged / Process Concluded])
                
πŸ’Ό Enterprise Source Code Access & Turn-Key Deployment
Official License Purchase & Pro-Forma Bank Wire Invoices.
Section 1.1
πŸ‘οΈ 240 Views

1.1 Master End-to-End Hospital Patient Journey

flowchart TD
    Start([Patient Enters Clinic / Portal]) --> RegCheck{Already Registered?}
    
    RegCheck -- No --> Register[Patient Registration / Reception Walk-in]
    RegCheck -- Yes --> Login[Login / Identity Verification]
    Register --> Login
    
    Login --> ServiceChoice{Required Service?}
    
    %% Outpatient Flow
    ServiceChoice -- Outpatient Consultation --> BookAppt[Book Appointment with Doctor]
    BookAppt --> ApptPending[Status: PENDING]
    ApptPending --> ConfirmAppt[Reception/Doctor Confirms: CONFIRMED]
    ConfirmAppt --> DoctorConsult[Doctor Consultation & Examination]
    DoctorConsult --> ApptComplete[Appointment Marked COMPLETED]
    DoctorConsult --> CreateEMR[Create Medical Record & Prescriptions]
    CreateEMR --> NeedAdmission{Needs Admission / Surgery?}
    
    %% Inpatient Flow
    NeedAdmission -- Yes --> CheckBed[Check Available Ward & Room]
    ServiceChoice -- Direct Inpatient Admission --> CheckBed
    
    CheckBed --> BedAvailable{Bed Available?}
    BedAvailable -- No --> Waitlist[Waitlist / Transfer / Select Alt Ward]
    Waitlist --> CheckBed
    BedAvailable -- Yes --> CreateAdmission[Process Admission: Room Marked OCCUPIED]
    CreateAdmission --> InpatientCare[Inpatient Treatment & Rounds]
    InpatientCare --> DischargeDecision{Ready for Discharge?}
    DischargeDecision -- No --> InpatientCare
    DischargeDecision -- Yes --> DischargeSummary[Author Discharge Summary & Mark Room AVAILABLE]
    
    %% Billing Flow
    NeedAdmission -- No --> GenBill[Generate Invoice / Bill]
    DischargeSummary --> GenBill
    
    GenBill --> AddBillItems[Calculate Consult, Meds, Labs & Room Fees]
    AddBillItems --> BillIssued[Invoice Status: UNPAID]
    BillIssued --> ProcessPayment[Patient Makes Payment: Cash/Card/Insurance/Bank]
    ProcessPayment --> PaidCheck{Full Amount Paid?}
    PaidCheck -- Partial --> PartialPaid[Status: PARTIALLY_PAID]
    PartialPaid --> ProcessPayment
    PaidCheck -- Full --> FullPaid[Status: PAID]
    
    FullPaid --> Finish([Patient Discharged / Process Concluded])
                

πŸ’‘ How It Works:

The Master End-to-End Hospital Patient Journey orchestrates the complete lifecycle of patient interactions from initial registration or login to final discharge and payment verification. It seamlessly branches between outpatient consultations (appointment scheduling, EMR generation, prescriptions) and inpatient ward stays (room availability checks, admission state tracking, discharge summaries), ultimately consolidating all charges into a unified financial ledger.

Section 1.2
πŸ‘οΈ 215 Views

1.2 User Authentication & Role-Based Navigation Flow

flowchart TD
    UserStart([User Enters System]) --> AuthCheck{Authenticated?}
    
    AuthCheck -- No --> LoginPage[Display Login Screen]
    LoginPage --> RoleSelection{Account Exists?}
    RoleSelection -- No --> SelfRegister[Patient Self-Registration /register/]
    SelfRegister --> LoginPage
    RoleSelection -- Yes --> SubmitAuth[Submit Username & Password]
    SubmitAuth --> ValidateAuth{Credentials Valid?}
    ValidateAuth -- No --> AuthError[Display Error Message]
    AuthError --> LoginPage
    ValidateAuth -- Yes --> SessionCreated[Create Authenticated Session]
    
    AuthCheck -- Yes --> SessionCreated
    SessionCreated --> CheckRole{User Role}
    
    CheckRole -- ADMIN --> AdminDash[Admin Dashboard\n- System Statistics\n- Full Clinic & Patient Access\n- Room & Ward Overview\n- Revenue & Financial Reports]
    
    CheckRole -- DOCTOR --> DoctorDash[Doctor Dashboard\n- Daily Appointment Queue\n- Patient Search & EHR View\n- Create Diagnoses & Prescriptions\n- Patient Admission Records]
    
    CheckRole -- RECEPTIONIST --> RecepDash[Receptionist Dashboard\n- Walk-in Registration\n- Appointment Scheduling\n- Room Admissions & Discharges\n- Invoice Generation & Billing]
    
    CheckRole -- PATIENT --> PatientDash[Patient Dashboard\n- My Appointments\n- My Prescriptions & Medical Records\n- My Bills & Payment History\n- Profile Settings]
                

πŸ’‘ How It Works:

This authentication pipeline enforces strict Role-Based Access Control (RBAC). Upon login credential verification, the system inspects the user's role flags (`ADMIN`, `DOCTOR`, `RECEPTIONIST`, `PATIENT`) and routes them to their specialized workspace, isolating administrative controls, medical record tools, reception operations, and patient self-service portals.

Section 1.3
πŸ‘οΈ 198 Views

1.3 Patient Onboarding & Profile Lifecycle

flowchart TD
    StartReg([Initiate Patient Onboarding]) --> Channel{Channel}
    
    %% Self Registration
    Channel -- Online Self-Service --> OnlineForm[Fill Registration Form /register/\nUsername, Password, Demographics]
    OnlineForm --> ValidateUserForm{Form Valid?}
    ValidateUserForm -- No --> ShowUserErrors[Show Validation Errors]
    ShowUserErrors --> OnlineForm
    ValidateUserForm -- Yes --> CreateUserObj[Create accounts.User: Role = PATIENT]
    CreateUserObj --> AutoCreatePatient[Auto-create clinic.Patient Profile]
    
    %% Staff Assisted
    Channel -- Reception Walk-in --> StaffForm[Receptionist Fills /clinic/patients/add/\nFull Demographics & Emergency Contact]
    StaffForm --> ValidateStaffForm{Form Valid?}
    ValidateStaffForm -- No --> ShowStaffErrors[Show Validation Errors]
    ShowStaffErrors --> StaffForm
    ValidateStaffForm -- Yes --> CreateStaffUser[Create User & Patient simultaneously]
    
    AutoCreatePatient --> ProfileReady[Patient Profile Active]
    CreateStaffUser --> ProfileReady
    
    ProfileReady --> EditProfile{Update Profile /profile/?}
    EditProfile -- Yes --> UpdateForm[Update Demographics, Medical History, Allergies]
    UpdateForm --> SyncModels[Synchronize User and Patient Model Data]
    SyncModels --> ProfileReady
    EditProfile -- No --> DashboardReady([Ready for Booking & Care])
                

πŸ’‘ How It Works:

Patient onboarding supports both online self-registration (`/register/`) and front-desk walk-in registration (`/clinic/patients/add/`). Both channels automatically instantiate linked `User` and `Patient` database models, synchronizing demographic info, emergency contacts, medical history, and allergy data.

Section 1.4
πŸ‘οΈ 185 Views

1.4 Appointment Booking & Status Lifecycle

flowchart TD
    StartBooking([Start Appointment Booking]) --> SelectDept[Select Medical Department]
    SelectDept --> SelectDoctor[Select Doctor & Check Availability]
    SelectDoctor --> SelectTime[Select Date, Time Slot & Reason]
    SelectTime --> SubmitBooking[Submit Appointment Request]
    
    SubmitBooking --> StatusPending[Status: PENDING]
    
    StatusPending --> ActionReview{Staff / Doctor Review}
    
    ActionReview -- Reject / Patient Cancels --> StatusCancelled[Status: CANCELLED]
    ActionReview -- Confirm Booking --> StatusConfirmed[Status: CONFIRMED]
    
    StatusConfirmed --> VisitDay{Visit Appointment Time}
    VisitDay -- Patient Did Not Arrive --> StatusNoShow[Status: NO_SHOW]
    VisitDay -- Patient Arrives --> Consultation[Doctor Consultation Conducted]
    
    Consultation --> StatusCompleted[Status: COMPLETED]
    StatusCompleted --> TriggerEMR[Prompt Doctor to Add Medical Record]
                

πŸ’‘ How It Works:

Appointments progress through a strict state lifecycle: `PENDING` → `CONFIRMED` → `COMPLETED` (or `CANCELLED` / `NO_SHOW`). When an appointment is marked `COMPLETED` after doctor examination, the system automatically prompts the attending physician to create a new Electronic Medical Record (EMR).

Section 1.5
πŸ‘οΈ 176 Views

1.5 Clinical Consultation, EMR & Prescription Flow

flowchart TD
    DoctorStart([Doctor Opens Patient Consultation]) --> ViewHistory[Inspect Patient History & Past Allergies]
    ViewHistory --> ExaminePatient[Perform Clinical Examination]
    ExaminePatient --> OpenEMRForm[Open Create Medical Record Form]
    
    OpenEMRForm --> InputClinicalData[Enter Symptoms, Diagnosis & Treatment Plan]
    InputClinicalData --> OrderLabs{Order Lab Tests?}
    OrderLabs -- Yes --> AddLabNotes[Record Lab Tests to be performed]
    OrderLabs -- No --> SetFollowup
    AddLabNotes --> SetFollowup[Set Next Follow-up Date]
    
    SetFollowup --> PrescribeMeds{Prescribe Medications?}
    PrescribeMeds -- Yes --> AddRxRow[Add Prescription Line Item\n- Drug Name\n- Dosage & Frequency\n- Duration & Instructions]
    AddRxRow --> MoreMeds{More Medications?}
    MoreMeds -- Yes --> AddRxRow
    MoreMeds -- No --> SaveRecord[Save Medical Record & Prescriptions]
    PrescribeMeds -- No --> SaveRecord
    
    SaveRecord --> LinkAppt{Linked to Appointment?}
    LinkAppt -- Yes --> MarkApptDone[Update Appointment Status to COMPLETED]
    LinkAppt -- No --> RecordSaved[Record Saved in Patient EHR]
    MarkApptDone --> RecordSaved
    
    RecordSaved --> NextClinicalStep{Next Action}
    NextClinicalStep -- Inpatient Needed --> TriggerAdmission[Refer for Inpatient Admission]
    NextClinicalStep -- Outpatient Only --> TriggerBilling[Send to Billing Desk]
                

πŸ’‘ How It Works:

During clinical consultations, doctors review patient history and allergies, log symptoms and diagnoses into EMR records, order laboratory tests, schedule follow-ups, and attach multi-line prescription items (dosage, frequency, duration). Saved records automatically link to appointments and route patients to billing or inpatient admission.

Section 1.6
πŸ‘οΈ 165 Views

1.6 Inpatient Ward Management & Admission/Discharge Flow

flowchart TD
    AdmitDecision([Patient Requires Inpatient Care]) --> OpenBedList[View Room Directory /clinic/rooms/]
    OpenBedList --> FilterWard[Filter by Ward Type:\nGeneral, Semi-Private, Private, ICU, Emergency, etc.]
    FilterWard --> CheckStatus{Room Status}
    
    CheckStatus -- OCCUPIED / MAINTENANCE --> ChooseOther[Select Alternate Room / Waitlist]
    ChooseOther --> OpenBedList
    
    CheckStatus -- AVAILABLE --> OpenAdmitForm[Open Admission Form /clinic/admissions/add/]
    OpenAdmitForm --> AssignDetails[Assign Patient, Room, Doctor & Admission Reason]
    AssignDetails --> SaveAdmission[Save Admission Record]
    
    SaveAdmission --> AutoOccupyRoom[System Trigger: Room Status -> OCCUPIED]
    AutoOccupyRoom --> InpatientStay[Patient Inpatient Stay & Treatment]
    
    InpatientStay --> DischargeReq{Doctor Approves Discharge?}
    DischargeReq -- No --> InpatientStay
    DischargeReq -- Yes --> OpenDischargeView[Open /clinic/admissions/id/discharge/]
    
    OpenDischargeView --> EnterSummary[Enter Discharge Summary & Set Discharge Date]
    EnterSummary --> SubmitDischarge[Submit Discharge]
    
    SubmitDischarge --> AutoFreeRoom[System Trigger: Room Status -> AVAILABLE]
    AutoFreeRoom --> AdmissionStatusDischarged[Admission Status -> DISCHARGED]
    AdmissionStatusDischarged --> RouteToBill[Generate Inpatient Hospital Bill]
                

πŸ’‘ How It Works:

Inpatient management tracks bed availability across 7 ward types (General, Semi-Private, Private, ICU, Emergency, Maternity, Pediatric). Database hooks automatically toggle room availability (`AVAILABLE` ↔ `OCCUPIED`) upon patient admission and discharge summary completion.

Section 1.7
πŸ‘οΈ 152 Views

1.7 Billing, Invoicing & Multi-Method Payment Lifecycle

flowchart TD
    BillStart([Create Bill Request]) --> SelectPatient[Select Patient & Link Appointment / Admission]
    SelectPatient --> AutoGenNumber[System Generates Invoice No: INV-YYYYMMDD-XXXXXX]
    
    AutoGenNumber --> AddItems[Add Bill Line Items\n- Consultations\n- Room Charges per Day\n- Lab Tests\n- Medications]
    
    AddItems --> ComputeTotals[Compute Subtotal\n+ Tax Amount\n- Discount Amount\n= Total Amount Due]
    
    ComputeTotals --> SetUnpaid[Initial Status: UNPAID\nPaid Amount = 0.00]
    
    SetUnpaid --> ReceivePayment([Receive Payment /billing/id/record-payment/])
    ReceivePayment --> SelectMethod[Select Payment Method:\nCash / Credit Card / Debit Card /\nInsurance / Bank Transfer / Other]
    SelectMethod --> InputAmount[Enter Payment Amount]
    
    InputAmount --> UpdateLedger[Update Paid Amount & Calculate Remaining Balance]
    
    UpdateLedger --> CheckBalance{Paid Amount >= Total Amount?}
    CheckBalance -- No, Partial --> StatusPartial[Status: PARTIALLY_PAID]
    StatusPartial --> OutstandingAlert[Outstanding Balance Visible on Invoices & Dashboard]
    OutstandingAlert --> ReceivePayment
    
    CheckBalance -- Yes, Complete --> StatusPaid[Status: PAID]
    StatusPaid --> SetPaidDate[Set Paid Timestamp]
    SetPaidDate --> BillComplete([Receipt Generated / Bill Finalized])
                

πŸ’‘ How It Works:

Invoicing generates unique UUID invoice numbers (`INV-YYYYMMDD-XXXXXX`), calculates subtotals, tax rates, and discounts across consultations, room rates, medications, and lab procedures, and tracks multi-channel payments (Cash, Card, Insurance, Transfer) through `UNPAID`, `PARTIALLY_PAID`, and `PAID` statuses.